Follow Me

Dropbox. ?Spread the word.  The first 2GB is free!

Journal Index

Entries by Fred Ruff (51)

Tuesday
Nov232010

3ds Max Doesn't Start -- Unknown property: "getMenu"

Have you ever gotten and error like this?

-- Unknown property: "getMenu" in undefined


Well, I have, and it means max will not start up correctly. After many hours trying to locate the problem I found the cause. The max default .mnu file got corrupted.

Go into your user settings folder (If your not aware of this folder, max creates this for you and all your local settings are stored here.) This folder is slightly different on different operating systems.  I am running Vista (Don't ask why, but it runs fine)

User Settings Folder - C:\Users\fredr\AppData\Local\Autodesk\3dsmax\2011 - 32bit\enu\UI

Once there, simply delete your MaxStartUI.mnu.  Next time you start max, it will notice the missing file and pull one from the program files location.  I have saved my .mnu file now so that when this happens again. (And I'm sure it will...)  I'll have it ready.

Friday
Nov192010

Understanding 3ds Max's Normals


 The other day someone asked me, "I cut a poly object in half, but when i render, I get a seam. Why is that?" If you've ever tried to make something the was two individual parts, look like it was one, you've run into this problem. This can happen when destroying something or making a hidden door appear from nowhere. (See the example to the right.)  I can try to explain why. Lets first start by understanding normals, and then how 3ds Max deals with normals.

Faceted and SmoothedWhat the hell is a "normal" anyway? I can only explain it the way I understand it.  Imagine we have 3 vertices that make a polygon.  That polygon has a direction, and that direction is where each of the verticies store a normal vector. (Imagine a little arrow point out of each vert on that polygon.) Now no polygon is truly smooth. Even when you have millions of polygons, they are all made up of small flat surfaces and therefore, are never really smooth. When the renderer (viewport, scanline or ray-tracer) hits the surface, it uses the interpolated normal direction when calculating how light hits the surface.  This can make it look smooth in the render than it actually is.   This will make all the little flat polys look like they are continuous across a surface when hit with light.  However, this easily breaks down when you have very few polygons.  Try smoothing all the normals on a cube, for example.  When smoothing across very hard angles the illusion looks silly.  

3ds Max has calculated normals.  I say "calculate" because max doesn't store normal information by default.  You see, back in the early days, it was decided that max would calculate the normals on the fly, instead of having to deal with them with every step in the modifer stack.  The benefit is that max can stack many modifiers and not have to deal with normals at all, until the end result.  This is why we have something called smoothing groups.  Smoothing groups are the idea that any 2 faces can share a group, and the normals will be averaged over those 2 polygons.  Smoothing groups may seem like a mystery, but think of it as a simple puzzle. Here are the rules...

Smoothing Group Rules:

  1. Faces that are welded together can be smoothed.  Faces that are separate elements will not be smoothed. (This is why separate parts don't smooth.)
  2. Each face can be part of 32 different smoothing groups.
  3. Any polygons that share a group number will smooth across the faces, assuming they are touching. (Rule #1)

 Here's an example of smoothing groups at work.

 Notice how the #1's and #2's all smooth together, and then in the third example, the center faces with #1's and #2's all smooth together.


Select Faces

Detach Faces

Now let's deal with our example where smoothing groups break down.  Lets take a few faces and detach them to a new object.  This is where the normals start looking broken and non-smoothed again since the faces are no longer connected. 

Now, Lets fix the problem we created. Select both of the objects and add an Edit Normals modifier on top.  Now, open the normals sub-object, and select the normals on each side of the break.  Press the average "Selected" button in the Edit Normals modifier.  This will make the poly across the different object smooth together. Do this with the rest of the polygons on the objects and you now should have a smooth surface across 2 separate objects.


 And finally, the result of fixing the normals on the iPhone transformer. If you look close, you can still see something going on there, but it works enough for what I'm doing.


Friday
Nov192010

Walking Dead - VFX Article

 A bunch of us get together every Thursday to have a few cocktails and watch AMC's "Walking Dead".  I just saw this article on the visual effects of that show and wanted to share it with everyone. 

http://www.fxguide.com/article660.html

Watch it on demand from Amazon. Walking Dead - Season 1

Thursday
Nov182010

New 3dsMax 2011 Icon

Tired of accidentally launching max 2011 when you meant to launch 2010? (Or vice-versa?)  Nothing fancy here, just a color shift to the 2011 icon and added 2011 text in the corner.  Download this new 3dsmax2011.ico file on the downloads page. Swap it out by editing the  shortcut properties on your desktop.

Wednesday
Nov172010

The Making of "Monsters"

I listened to an FX Guide podcast last week on the making of  Monsters. (Listen to it here) A technical director, (Gareth Edwards) got a chance to make his own independent monster movie on the cheap.  If your anything like me, hearing about a technical director that gets to make is own movie probably gets you pretty excited.

MONSTERS - A crashed space probe over Mexico changes life as we know it when giant aliens begin to appear. A couple must travel through the dangerous infected zone to get back to the US in this stunning sci-fi epic.

He apparently shot it in Mexico over 6 weeks and did all the effects himself over 5 months.  He used 3ds max for his creatures and said that only 3 shots were 3d tracked.  Everything was 2d tracked with Mocca.

He said something like 'Most movies paint a target on the wall and after production, they hope that the arrow hits that target.  We shot the movie with the ending in mind, but we let the shooting wander. We shot the arrow first, then painted the target around it during editing.'

What's also cool is that you could get it before it was even out in the theaters.  Check it out, even just to see how much effects one man can do over 5 months.  It's available at Amazon.com Here

Listen to the podcast, then watch the movie.  In my opinion it wasn't bad at all. Then again, I listened to the podcast, and maybe I am biased to the TD making a good movie.


Sunday
Nov142010

2011 - Classic Max Interface


I just started converting the studio over to max 2011. (Mainly for the EXR improvements, thats pretty much it.) Many people including myself are frustrated with Autodesk's lack of respect for the user interface in 3dsmax.

 When I worked back at Autodesk, I moved the "Make Preview" item from the rendering menu, to the animation menu, and I got so much shit for it.  I learned my lesson on that.  (I thought it made more logical sense to refer to it as an animation action then a rendering one.) At the same time, I also assigned a ton of default hotkeys.  Before Max 5, there really weren't many hotkeys.  One of my first actions as product designer was to assign default hotkeys.   The one that caused some controversy was the "W" key.  it was originally maximize viewport, but I wanted to make it easy for Maya users to jump into Max and to do this, I would have to change it.  I went for it and re-assigned maximize viewport to "ALT+W"  I did get a little flack for it, but I didn't regret the decision.  People quickly adjusted and I unified some hotkeys between Max and Maya, making them similar when it came to basic hotkeys.

The user interface can be improved, but most of the choices we're seeing are not being considered improvements to the user base. They're just changes. 

The Icons

Icons had color, now they are monochrome.  This makes them hard to decipher, end of story. I put them back to the classic icons, and kept the newer ones. Download the classic icons for 2011 here.

The Menu

The Idea that the new large button in the upper left corner will replace the old file menu is silly. (I couldn't find a what to put save increment in it?) Want it back, it's still there, just drag it back onto the main menu bar.  I also dropped Save Increment into the file menu. Download this version of the max menus here.

The Colors

No need for a download here.  Just load up the lighter colors that come with max. The attempt to do darker colors came from the discreet tools like flame and Inferno, but the max conversion just isn't as elegant.

Saturday
Nov132010

Just Saw Kick Ass

Todays 3 sentence movie review... Kick Ass! 


Oh yeah!  I just watched Kick-As slast night on Blu-Ray and It was freaking awesome. FUN as hell.  Very unexpected and absolutely awesome. I purposely tried not to hear anything about this movie when it came out and I'm glad I did. 

(Hard to believe that it's only $12.99 for Blu-Ray at Amazon! Click here) Got to be one of the best movies I've seen this year. It was great! 

Saturday
Nov132010

Particle Flow - A History and Practical Applications

Wow, that title sounds like a fancy Siggraph paper...

One of my favorite parts of 3ds Max is the Particle Flow system.  Maybe because I had a hand in designing it, or maybe because Oleg over at Orbaz Technologies is brilliant? 

The year was 2001...

3dsmax was in desperate need of a new particle system.  Autodesk,or was it Kinetix, no wait, Autodesk Multimedia, no wait, discreet?  Shit, I don't remember. (And I don't care anymore.) Anyway, they hired the right man for the job.  Oleg Bayborodin. Oleg had had some previous experience with particles and wanted to take on building an event driven particle system.

Here's where I come in.  I designed the entire sub-system architecture! (Wow I can't even lie very well.)  Just kidding.  Oleg designed and built the whole whole thing.  My job, was to consider the user experience, assist in UI design and provide use cases for how the tool was going to be used.

Particle Flow Design Analogy

I used to be love experimenting with electronics as a kid, and when I saw the design of particle flow, It reminded of electronic schematics.  (I built my share of black boxes with blinking LED's in them, pretending they were "bombs", or hi tech security devices.) So I ran with that as an analogy.  Recently I came across some of the original designs and images that inspired the particle flow UI design.

Schematic Inspirations
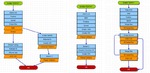
 

Early design


We then started to apply it to these particle events, which were more like integrated circuits than transistors and resistors. We used a simple flow chart tool to design them and that started to look like this.


From there, the design started to look more like what we see today.
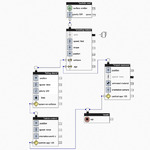
Final design

 Unfortunately, since we were building a new core system from scratch, some of the use cases couldn't be achieved with this first incarnation of the system.  We only time to do so many operators and tests. Bummer. But everyone figured we'd get to a second round of particle operators in the next release of max, so no big deal.  However, Autodesk did some restructuring and a few engineers were let go and we were left with a great core, and no one to build on it.

Luckily, Oleg went on to create a series of Particle Flow extension packs and I hope he's making a good living off them. So let's look at using Particle Flow in production.

Particle Wheat Field for Tetra Pak

Here's a fun commercial. Let's go over some of the ways particle flow was used in this spot for Tetra Pak.  First, let's take a look at the spot.


I was asked to create a field of wheat that could be cut down, sucked up into the air, and re-grown. It seems so simple to me now, but when you think about it, that's a pretty tall order.  I went directly to a particle system due to the overall number of wheat stalks. (Imagine animating this by hand!)  

 At first I create a 3d wheat stalk and instanced it as particles.  This was a great start, but it looked very fake and CG, and since I modeled each wheat grain (Or whatever you call individual wheats) the geometry was pretty heavy.  Other issues were having the wheat grow, get cut and re-grow.  As I tried an animated CG wheat stalk as an animated instance mesh particle, but this brought  the system to a crawl. I quickly realized that a "card" system would work much better.  Also, Bent has many stop motion animators so we thought we would lean on our down shooter and an animator.  This worked great.  We now had a sequence of animated paper wheat stalks that could grow by simply swapping out the material per frame.  (did you get all that?)


Blowing in the wind was also a tricky thing at first.  I thought I might be able to slap a bend modifier on the card and have the particles randomize the animation per particle, but thatwon't work.  They won't  move like a field of wheat. Instead, each particle would have a randomizing bend animation. Instead, I had to use lock\bond, part of particle flow box 1. (Now part of 3ds Max) This worked really good. The stalked waved from the base, not exactly what I wanted, but it worked good enough.


Wheat stalk shadows were my next problem.  Since I was now using cards with opacity, my shadows were shadows of the cards, not the alpha images.  They only way to deal with this was brute force.  I had to switch over to ray traced shadows. At this time I split up the wheat field into 4 sections. This allowed me to render each section and not blow out my render farm memory.

From here, the cutting of wheat was a simple event, along with growing the wheat back.  Much of the work was in editing the sequence of images on the cards. The final system looked like this.


The Falling Bread

The second problem I ran into on this job was when the bread falls on Bob. (That's the bunny's name)  At first I tried to use max's embedded game dynamics system, reactor.  I knew this would fail, but I always give things a good try first.  It did fail.  Terribly. Although I did get a pile of objects to land on him, they jiggled and chattered and would never settle. Not just settle in a way i like, but settle at all.

Particle Flow Box #2 had just been released.  This new extension pack for particle flow allows you to take particles into a dynamic event where simulations can be computed. Particle Flow Box#2 uses Nvidia's PhysX dynamics system, which proved to be very usable for production animation. (PhysX dynamics are now available for 3ds Max 2011 as an extension pack for subscription users.)

With Box#2 installed, making the bread drop was so easy. There really isn't much to say about it. Box #2 has a default system that drops things so I was able to finish the simulation in a day or so, tweaking some bounce and friction settings.  I used a small tube on the ground to contain the bread so that the it would "pile up" a bit around the character. 

Schooling Fish

A shot of the Sardine ModelTo show just one more example of how flexible Particle Flow really is, here's a spot I worked on where I used Particle Flow to control a school of sardines for the Monterey Aquarium. I should mention that I only worked on the sardines in the first spot, and all of  these spots were done by Fashion Buddha.


Thursday
Nov112010

Customizing 3DS Max Start Up Settings

How many times a day do you start a new scene in 3ds max and switch the renderer to Vray and set up all your default settings?  Are you ever in the middle of animating, only to realize that you forgot to switch your framerate to 24 fps?  I have the answer to those problems and more.

One of the simplest and most useful things about 3dsmax is a secret file called maxstart.max.  It doesn't exist when the program is installed, but all you have to do is create it in your default \Scenes folder, and when max is started or reset, this file is loaded. So start up 3ds max and lets set some good startup defaults going.


Set the default Framerate

 I don't know about you, but almost everything I do is at 24 frames per second. (Maybe cause we all want to believe that everything we do is a little film.) Every once in a while I do something for PAL in which it becomes 25 fps, but 24 is my default 90% of the time.  Open the time configuration dialog and set your framerate. 


Set your default Animation Range

You'll notice that when you switch from 30 to 24 fps, the time range with shorten to 80 frames.  You might as well set this to what you want also. I want to start with 6 seconds of time. (24*6 = 144 frames)

Set Your default Gamma

I'll do a whole entry on gamma at another time. I mention this now since my render settings will be taking this into account in the next section.

  • Gamma = 2.2
  • Affect Color Selectors = True (Duh)
  • Affect Material Editor= True (Of course)
  • Input Gamma = 2.2 (To compensate for images comming in as textures)
  • Output Gamma = 1.0 (Because I want my images linear space for compositing)


Set up your default Renderer

Now I'm sure your using something other than the max renderer (I love you baby. We went threw some good times together back in the day, but I outgrew you years ago.) so go ahead and set that up, along with any default settings you like.  Here's my defaults and a brief explanation of why. If you have any questions, hit me up in the forum section.

  • Enable Built in Frame Buffer (Cause tracking the mouse while rendering is awesome)
  • GI Environment = On (Cause my background image is NEVER my GI source)
  • GI Environment Color = White (I don't like to put any color in without thinking about it)
  • GI Environment Multiplier = .25 (I use a gamma of 2.2 and therefore don't need the GI so high)
  • Color Mapping Gamma = 2.2
  • Color Mapping Don't Affect Colors = True (This allows Vray to consider 2.2 gamma correctly, without adding it to the final image. Press the sRGB button when the frame buffer comes up to see the image with and without 2.2 gamma)
  • GI = On
  • Ambient Occlusion = On (Hell why not, adds a little extra detail)
  • Irradiance Map, Custom, -3 -3  (Because when you start working on a scene, you don't need to run through 3 pre-pass stages to see what the hells going on. Save yourself some time would ya.)

 Set up your default 3D Scene

I like to always start with a matte shadow ground plane so shadows have someplace to land. Also, don't leave your background completely black.  It's very mis-leading when rendering models.  I like to throw in some kind of gradient or something so that's lighter, but not completely white either.  I find a light warm color works pretty good.

Set up your Material Editor

Finally, if set up your material editor to have some Vray materials to work with.  For this, I'll show you a little trick so that the reset material editor slot command fills it with Vray materials instead of max materials.

Go to Customize>Customize User Interface>Menus,  From there, navigate the right drop down to Medit - Utilities.  This shows you the menu for the material editor's Utilities menu. Right click on the action item "Reset Material Editor Slots" and click "Edit Macro Script" This brings up a maxscript file that has 3 macros in it.  We will edit the reset macro so that it resets the slots.  Find this line.

meditMaterials[i] = defaultMtl name:(defaultMtl.localizedName + #'_' as string + i as string)

and replace the defaultMtl with VRayMtl.  Press CTRL+S to save that script and CTRL+E to evaluate it.  Now just go to the material editor and run the rest command under the utilities menu.

Ta Da!  Now save that file out as maxstart.max in your scenes folder and every time you start up, that will be your start up scene. See the Download section for my example maxstart.max file.

(Note: If your having a problem getting the maxstart.max file to load, check to make sure that it's in your default scenes folder.  Go to customize>Configure User Paths to figure out where your scenes folder is pointed to.)

Tuesday
Nov092010

Ruff's Stuff Blog Up and Running

OK,  I just got the new blog up and running.  I'm hoping to fill it with tips tricks and theories of all different aspects of  3d computer graphics.

Monday
Nov012010

Canon T3I Camera

Check out this camera yo!


Page 1 2 3