Friday
Dec032010
Getting Good Fur from 3ds max
 Friday, December 3, 2010 at 11:41AM
 OK, let's all admit that we're a little disapointed with the Hair and Fur system in 3ds max. However, if you can't afford a better solution like Hair Farm, there is still hope. Although the system is max has it's issues, you can still get some decent fur renderings out of it. Here's a few fur tips that I remember doing before we got Hair-Farm.


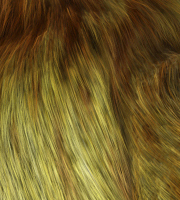
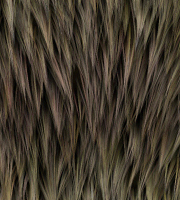
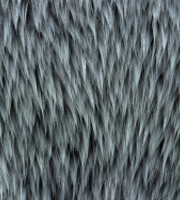
These are a few examples of Fur that I've done with max's hair and fur system. (The are close up's. I didn't get approval to show the characters.)
Styling Fur
- When you first apply hair and fur, it might be very long compared to your model. (I have no idea how the hell it gets it's scale. It seems to be arbitrary to me.) Don't try to use the sacle setting to make it smaller. Use the style tools to get it smaller, then use the scale and cut spinners to tweak it when finishing.
- First thing I usually do is go into style mode and get the length right. To do this you will have to first turn off DISTANCE FADE so that you can do an overall scale without having the brush fall-off from the center. Then zoom way out and try to eye it up from afar.
- Next, it the comb tool This is great for animal fur. Yes, I said it was great and it is. Use the transform brush to quickly brush the hair in a general direction. Then press the comb button. Ta da! Great for making hair lie down along your surface very fast.
- Frizz is wavy and useful, Kink is some weird noise pattern that scatters the hair vertices. I try to avoid it. It's not very realistic.
- There is no way to make perfect little loops or helix's. Get over it. You can try to style it, but that might make you insane.
Lighting and Rendering
- Don't try to use geometry. it's stupid. Take advantage of the buffer renderer as much as possible.
- I also didn't find mental ray primitive option a solution. Mental ray is a raytracer so to get smooth hair from frame to frame, you had to turn up the anti aliasing so high, I found it looked just like the buffer hair anyway.
- Turn off the vray frame buffer. Hair and Fur are render effects and are computed into the max frame buffer. You won't see then in the vray frame buffer.
- Switch back to shadow maps and get over it. (Or render separate passes to use Vray soft shadows)
- Keep the light cones tight around your hair since it's now resolution dependent. (thats what she said?) Start with at least 1k hair maps. Im sure you'll need them to be 2k if your animating.
- Start to turn up the total number of hair, but render aas you go. (And save before rendering)
- Watch for missing buckets. If this happens, you can make the buckets smaller. in the Render Effects dialog.
- Use thickness to fill between hairs. If you can't throw any more hairs at it, thicken the hairs. Better yet, make sure the surface underneath has a hair looking texture on it. That will keep your render time down too.
Material
- Turn down the shininess right away. Its supposedly for simulating real hair, but often it looks very artificial.
- Maker sure to set the colors for the tip and root to white when using texture maps. These color swatches are multiplicative and anything other than white will make your map look wrong.
- Look out for the Hue variation amount. It's defaulted at 10% and that'd high. It will vary the hue of the hair and can start you off with purple, red and brownish hairs.
Don't get me wrong. Max's hair and fur is a pretty much a pain in the ass and really should delt with. I'm now using Hair Farm like I mentioned above, and the difference is worlds apart. Hair farm is fast, robust and the results look very nice. (Speed is king in look development. if you can render it fast, you can render it over and over, really working with the materials and lighting to make it look the way you want.)
 Fred Ruff |
  3 Comments |


Reader Comments (3)
Hey there,
Thanx for the info.
I'm using hair and fur for a while also. Like you said, it's a pain... but still not sooooo bad.
But , i'm dealing with a huge problem, and maybe you could help me out on that one.
Is there a possibility to scale a mesh with the hair and fur mod applied to it correctly? Without destroying the haircut? A way to rescale mesh and hair together?
It seems I can't find any info on this..
Thanks in advance!!
Hmm, i don't know if you can. What about converting to splines, scaling, and re-importing from splines?
Not a bad idea.. I'll give it a try! thanx