

Skin Basics
The other night I was skinning a character and realized that some beginners might get a little lost when it comes to skinning. It started when I brought up the weight table and had to set 3 or 4 options before I could even use it. So... here are my skin basics.
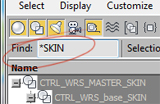 Check your bones first. Did you name all your bones properly? Before you go assigning bones to a skin, make sure they are named. When I rig, I have bones that are meant for skinning and bones that are for the rig. I add the suffix '_SKIN' on all my skin bones. When picking the bones to add to the skin modifier, I just filter '*SKIN" in the select by name dialog and grab all the right bones in a split second.
The first thing I do after applying the skin modifier to a model is set up the default envelopes. Although they seem strange and confusing I still find them very helpful for smoothing out joints. Don't jump to hand weighting verticies until your envelopes are working pretty good. If a joint creases too much, make the ends of each envelope larger and larger balancing one with the other. You can also move envelope locations by sliding the envelopes around. This might confuse you but keep in mind this is just the volume that will be affected by the bone. It doesn't change where the bone pivots from.
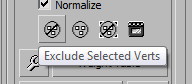 Use excluded verts for fixing the most extreme verts. If you go setting weights on the arm verts to get the spine bones not to affect it, you won't be able to adjust the envelopes for the elbow. Using exclusions allows you to still weight with broad envelopes.
;) Bad DefaultsWhenever I skin up a character using 3dsmax's skin modifier, I always end up in the weight table. It's a very useful tool for finalizing the skin after you've set up all your envelopes to be as good as they can be. However, you need to set it up correctly. When you open the weight table it's overwhelming with bone names across and vertex number down it. Vert #1823? Which one is that? This doesn't really work by default.
Bad DefaultsWhenever I skin up a character using 3dsmax's skin modifier, I always end up in the weight table. It's a very useful tool for finalizing the skin after you've set up all your envelopes to be as good as they can be. However, you need to set it up correctly. When you open the weight table it's overwhelming with bone names across and vertex number down it. Vert #1823? Which one is that? This doesn't really work by default.
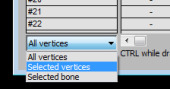 To make your weight table useful again, do this. Set the weight table to 'Selected Vertices'. Now as you select verts you will see how much influence each bone has on them. Next set it to 'Show Affected Bones' to only show only the bones that affect the selected vertices.
 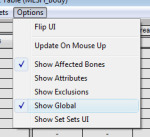 Now you can see the selected verts and how they under skin influence. Finally, check the Use Global setting. This adds an extra cell in the chart that can be used to adjust the entire bone column of selected verts. The super part about this is that the effect is additive to the existing weight so each vert is tweaked a little without having to be forced to be the same value.
Also, select the bone you want to view and it will show up in bold blue background. If the bone doesnt show up, its becasue it has no weights assigned to those verts. use the Abs Effect spinner to add a little, and then you can slide it up from there. You can also use the 'Affect Sel. Verts' option to dial in weights for only certain vertices in you table.
;)
Questions? Post them to the Forum. Comments, post them to the Journal. Was this helpful... boring? let me that too. I hate boring stuff.
 3ds max