I already talked about creating chrome balls and parnoramic HDR images, now let's talk about how to use them in max. This article covers just the mirrored ball technique. We'll talk about panoramic images in a follow up article. If you're looking to buy a gazing ball, click here.
Step 1 - Environment Map - Background
Let's set up the background image so we can see our render, pre-composited, on the background. I do this with an background environment map (8) and then set the viewport background (Alt-B) to use the environment for the viewport display. Now when you render you'll see the same image in the render as in the viewport background.
Throw a sphere into the scene and apply a fresh Vray material to it. Add a camera and set up Vray as the renderer. Don't turn GI on yet. Turn off default lighting in the renderer so you can do a test rendering. With no lights and default lights off, your rendering should be black. Make sure it is. If you now turn on GI and render, your sphere will blend right into the background like some predator effect.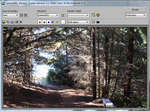 This is because Vray assumes the environment\background slot is what you are lighting with. Since the background is in screen space, it applies a very artificial effect to the scene. Your background image is acting as the GI light, but it's also projected in screen space so the results are strange. If you do use GI, you'll have to turn on the GI environment override within the and use the color swatch or the texture slot to add skylight GI to the scene. For now, leave it off. Its less confusing. (I always end up using the override anyway, so might as well turn it on, and set the multiplier to 0 for now.)
Step 2 - Setup the HDR Light
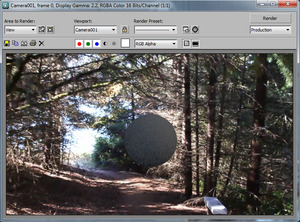
 Now that we have a background with no light coming into the scene, let's set up your light. Make a Vray light, and set it to be a dome light. Set the multiplier to 1.0, and turn on spherical (full dome). Drop a VrayHDRI map into the image slot. Set the resolution to whatever your chrome ball is set to. In our case 1024. Drag that map over to the material editor as an instance so you can work with it some more. Browse for your hdr chrome ball. Choose "Mirrored Ball" in the radiobutton Do a test render and you'll start getting something. But is it right? Probably not. It might look something like this.
Step 3 - Deal with the Grain and Gamma
So if your image looks like the one above, the first thing you'll notice is the grain. Some of this is because my gamma is set to 2.2. When using 2.2 gamma, your blacks will be boosted and appear grainy. Vray calculates some things by contrast. 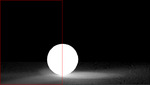 When you gamma correct, you change the overall contrast. You could try turning up all your Vray settings to fix this, but instead, set the color mapping gamme to 2.2, and turn on "Don't Affect Colors (Adaptation Only)" This "adapts" Vray and tells it that all the settings of anti aliasing and DMC noise are now working in a gamma 2.2 space. More on this in this article. If you render again, alot of the grain will go away. But not all of it. The rest is due to the HDR dome light we created. By default, Vray lights are set to only 8 samples. This works for smaller area lights, but when you spread all that over an entire dome of a scene, you'll need more samples. You'll probably have to go up to 32 or even 64 samples, depending on your scene. I leave it at 8 for speed and tune that later in final rendering.
Step 4- Make a virtual mirrored ball
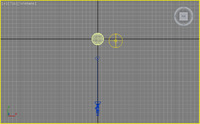
 The only way to really know if your HDRI is working right is to make your own mirrored ball. Throw a fully reflective material on that sphere and do a test render. Depending on where your camera is located your mirrored ball will look different, but if your anything like me, your camera is more often placed to the south, pointing north like in this image. I think I do this because I like my camera pointing from the "Front" direction.
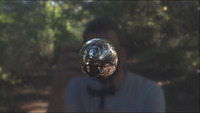
Hey, whos that handsome fella? Wait, shouldn't I be in the ball, not the background? Wait, we're looking at the BACK of the mirrored ball! For some odd reason, the default orientation for a mirrored ball is facing north? It assumes the camera is pointing from the back view. (Seems wrong with my logic, but maybe there is a reason?) So... to fix this, we can just rotate the Horiz. Rotation 180 degrees.
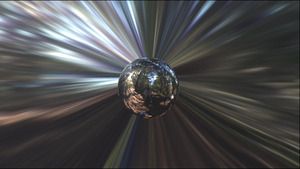
That's the right way, with the streaks in the background, and the chrome ball looks like the original chrome ball with me reflecting in it. We have now digitally captured that lighting scenario, and re-created it virtually. (Sorta) I don't think that's all thought. If you can make it look better, do it. Go farther. Although we captured the basic lighting, we don't get the dappled light through the trees. We don't get a darkening below the ball, as if the ground were there. We're only half way there. This is your starting point for your ambient light.
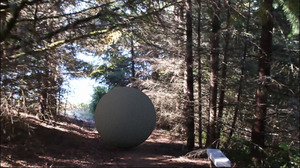
Let's set up a plane for catching shadows. make a plane, set the vray properties to matte, and -1 and check the shadow options. Put that material back to basic gray. You'll never see light on the chrome ball. Now you should get a render with a soft shadow under the ball.
 Let's make a key light. Let's make it based on our HDRI!
 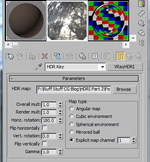 If you've read up to this point good for you. If you feel you knew all this, great! Here's the little tid bit you might want to take away from all this. Now that we have our environment, Let's break it up and work with it. I take the mirrored ball image and clip out a section to use as my sun. I then put that, as a projector, and turn up it to make it look like the sun poking through the trees. The result looks something like this.


 Fred Ruff

;)
;)
;)


;)
;)
;)
;)
;)
;)
;)
;)
;)
;)
;)

;)