Linear Workflow with Vray in 3dsmax
 Wednesday, December 15, 2010 at 7:25PM
 These days, most shops are using a linear workflow for lighting and rendering computer graphics. If you don't know what that means, read on. If you do know, and want to know more about how to do it specifically in 3dsmax, read on as well.
Why use a linear workflow?
First thing about linear workflow is that It can actually make your CG look better and more realistic. Do I really need to say anymore? If that doesn't convince you, the second reason is so you can composite your images correctly . (Especially when using render elements.) Also, it gives you more control to re-expose the final without having to re-render all your CG. And finally, many SLR cameras and Digital cameras are now supporting linear images so it makes sense to keep in linear all throughout the pipeline.
A bit on Gamma
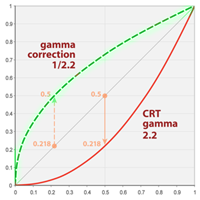 Lets start with an example of taking a photo on a digital camera. You take a picture, you look at it, it looks right. However, you should know that the camera encoded a 2.2 gamma curve into the image already. Why, because they are taking into account the display of this image on a monitor. A monitor or TV is not a linear device. So the camera maker applies a gamma curve to the image to compensate. A gamma encoded curve looks something like this. The red curve shows how a monitor handles the display of the image. Notice the green line which is 2.2 gamma. It's directly opposite to the monitor display, and when they combine, we get the gray line in the middle. So gamma is about compensation. Read more on gamma here.
The problem comes in when you start to apply mathematics to the image. (like compositing or putting render elements back together) Now, the mathematics are off since the original image has been bent to incorporate the gamma. So, the solution is to work with the original linear space images, and apply gamma to the result, not the source. NOTE: Linear images look darker with high contrast until you apply the display gamma to it. TV's use a gamma of 2.2.
The problem also comes with computer graphics generated imagery. All of CG is essentially mathematics, and for years many of us have just delt with this. However, now that most renderers can simulate global illumination, the problem is compounded. Again, the solution is let the computer work in linear space, and bent only the final results.
Why we use 16 bit EXR's
 So, now that we know we have to work with linear images, lets talk about how. Bit depth is the first problem. Many of us were using 8 bit images for years. I swore by targas for so long, mainly cause every program handled them the same. Targa's are 8 bit images with color in a space of 0-255. So if you save the data with only 255 levels of each R-G-B color and alpha, when you gamma the image after, the dark end of the spectrum it will be "crunchy" since there wasn't much data in there to begin with. NOw that very little data has been stretched. Here's where 16 bit and 32 bit images come into play. You could use any format of storage that support 16 bit. 16 bit is plenty for me, 32 is a bit of depth overkill and makes very large images. Then you can adjust the resulting images with gamma and even exposure changes without those blacks getting destroyed. EXR's seem to be the popular format since it came out of ILM and has support for multiple channels. It also has some extended compression options for per scanline and zipped scanline storage so it can be read faster.
Does 3dsmax apply gamma?
Not by default. 3dsmax has had gamma controls in the program since the beginning, but many people don't understand why or how to use it. So what you've probably been working with and looking at is linear images that are trying to look like gamma adjusted images. And your trying to make your CG look real? I bet your renderings always have a lot of contrast, and your probably turning up the GI to try and get detail in the blacks.
Setting up Linear Workflow in 3dsmax
Setup 3dsmax Gamma
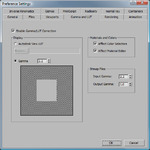 First, let' set up the gamma in 3dsmax. Start at the menu bar, Customize>Preferences and go to the Gamma and LUT tab. (LUT stand for Look Up Table. You can now use custom LUT's for different media formats like film.) Enable the gamma option and set it to 2.2 (Ignore the gray box inside the black and white box.) Set the Input gamma to 2.2. This will compensate all your textures and backgrounds to look right in the end. Set the Output gamma to 1.0 This means we will see all our images in max with a gamma of 2.2, but when we save them to disk, they will be linear. While your here, check the option in Materials and Color Selectors since we want to see what were working with. That's pretty much it for max. Now lets talk about how this applies to Vray.
Setting up Gamma for Vray
 You really don't have to do anything to Vray to make it work, but you can do a couple things to make it work better. First off, many of Vray's controls for GI and anti-aliasing are based on color thresholds. It analyzes the color difference between pixels and based on that does some raytracing stuff. Now that we just turned on gamma of 2.2 we will start to see more noise in our blacks. Let's let Vray know that were are in linear space and have it "Adapt" to this environment.
Vray has it's own equivalent of exposure control called Color Mapping. let's set the gamma to 2.2 and check the option, "Don't affect colors (adaptation only)". This will tell Vray to work in linear space, and now our default color thresholds for anti-aliasing and GI don't need to be drastically changed. Sometimes when Im working on a model or NOT rendering for composite, I turn off the "Don't affect colors)" which means that I'm encoding the 2.2 and when I save the file as a JPG or something, it will look right. (This easily confuses people so stay away from switching around on a job.)
Vray Frame Buffer
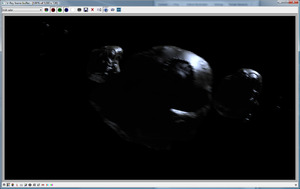
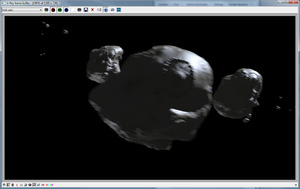
I tend to almost always use the Vray frame buffer. I love that it has a toggle for looking at the image with the view gamma and without. (Not to mention the "Track Mouse while Rendering" tool in there.) The little sRGB button will apply a 2.2 gamma to the image so you can look at it in gamma space while the rendering is still in linear space. Here is just an example of the same image with and without 2.2 gamma. Notice the sRGB button in the bottom of these images.
This asteroid scene is show without the gamma, and with a 2.2 gamma. Try doing that to an 8 bit image. There would hardly be any information in the deep blacks. With a linear image, I can now see the tiny bit of GI in the asteroid darker side.
Pitfalls...
Vray'sLinear Workflow Checkbox
I'm referring to the check box in the Color Mapping controls of the Vray Renderer. Don't use this. It's misleading. It's used to take an older scene that was lit and rendered without gamma in mind and does an inverse correction to all the materials. Investigate it if your re-purposing an older scene.
Correctly Using Data Maps (Normal Maps)
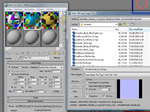 Now that we told max to adjust every incoming texture to compensate for this monitor sillyness we have to be careful. For example, now when you load a normal map, it will try and apply a reverse gamma curve to the map, which is not what you want. This will make your renderings look really fucked up if they are gammed compensated. Surface normals will point the wrong way. To fix this, always set the normal map image to a predefined gamma of 1.0 when loading it. I'm still looking for discussion about if reflection maps and other data maps should be set to 1.0. I've tried it both ways, and unlike normals, which are direction vectors, reflection maps just reflect more or less based on gamma. It makes a difference, but it seems fine.
Always Adopt on Open
I've also taken on the ritual of always taking on the Gamma of the scene I'm loading. Always say yes, and you shouldn't have problems jumping from job to job scene to scene.
Hope that helps to explain some things, or at least starts the process of understanding it. Feel free to post questions since I tend to try to keep the tech explanations very simple. I'll try post a follow up article on how to use linear EXR's in After Effects



Reader Comments (22)
Good entry, it explains what i've been using for the last couple of years, im looking foward for your next post about working with exr.
I was gonna briefly go over setting it up in after effects but hit me up if you got any specific questions.
oh my, you are reading my mind!, it would be great if you could mention how embed all element layer passes on a single exr, and if by any chance ,the workflow for animations, (how to save the file secuences), im still fighting with it right now. Thank you very much for your time.and i hope my questions dont distract your initial goal.
Ah, the single exr file. I'm just starting to learn Nuke, and we're at CS 3 for after effects. So we still use them split up. I'll roll that into the one on render elements. Look for it maybe next week.
Don't set the input gamma, you should NEVER be working with non-linear images as inputs at all. Better to linearize the FIRST and then import them. Why would you want to do an exponential operation on ever bitmap every single time you render? It's computationally inefficient. Furthermore, assuming that all the input maps are equally non-linear is a poor assumption anyway.
Tiffs can be 16 or 32 bit. There's nothing inherently 8 bit about them. The advantage of EXR's isn't in the accuracy they provide, but in the compression.
Good point, but where then are you getting all your linear textures from? Most are all in RGB space so it's nice to be able to still use them. I find that most images are still in RGB space and I special case my .dpx footage along with anything else that is linear.
I'm really enjoying your blog posts, Fred.
This is another good one.
I don't do much rendering the last few years (mostly game stuff and programming) but this is the first, to the point and simple to read, linear workflow article I've read.
I like your 'Lets not waste the readers time' writting style, but you manage to explain everything very clearly.
Excellent.
plus, everything that comes from photoshop is in sRGB, ain't it?
sRGB, not RGB. And no, not everything is sRGB, either. Besides, even if it WAS, you might be factoring out the gamma, but that doesn't mean you've corrected for exposure or whitebalance. So you might as well do all of that ahead of time and end up with linear images with the same whitepoint and exposure. It's not that you are getting linear textures, it's that you are MAKING them linear before you load them. You can use Photoshop or Fusion or Nuke or whatever to do that conversion.
Dont forget to take a look at this VRay Image to EXR script http://www.scriptspot.com/3ds-max/scripts/convert-vrimg-to-exr
Thanks Kees, I think the last time we were in a room together we had many of the 3ds engineers and we were all talking about animation, gimbal and IK. Yes, all you users who slam the engineering process, we DID meet with customers and we DID try to solve their problems.
Gamma correcting texture maps and leaving input gamma at 1.0 is a new twist on this topic ( for me anyway). It makes sense and simplifies a few things inside Max, but it creates more work on the front end.
@chad, I won't pretend to understand ALL of photoshop's color space settings. How do you work on a linear texture map in PS while viewing it in a gamma compensated way? Simply with an Exposure Adjustment Layer over the top of everything? Or do you set up PS like Max, to work Linear but view Gamma compensated?
Another thing to watch out for in Max with input Gamma set to 2.2 is that many HDR images are Linear and don't need gamma correction.
I don't agree with an input of 1.0 either. I understand the logic of it, but I don't think it's reasonable to work with all of your textures in linear space.
Or do you set up PS like Max, to work Linear but view Gamma compensated?
Yeah, you work linear (Photoshop has always done this) and just view the images gamma corrected.
I don't think it's reasonable to work with all of your textures in linear space.
The alternative (the way Max corrects the images on load) is just plain wrong. The idea is that you want the RESULT to be linear. There's no assurance that 3ds max will convert the images to linear, since it ignores what the input gamma is and doesn't affect exposure or white point at all.
It's not that bad to pre-process your textures to linear. You do it ONCE, and never again. It goes into your texture library and you never look back. If you end up converting it in 3ds max (even if you do it correctly, which isn't assured) then you have to convert that texture every time you load it. Just on one scene that could be thousands of times. If it's a texture in your library, you might be reusing it for dozens of shots.
Good stuff.
Great post, but not to be confused with cineon log (for those working on film scans) which is explained fairly well here . . . http://magazine.creativecow.net/article/cineon-files-what-they-are-and-how-to-work-with-them
Thanks for that Tarn. Good read. He said something about converting that cineon file to linear, but he didn't cover it in that article. I like cineon more knowing how it stores more black data than white. Logarithmic seems to be a greaty way to store HDR data.
Thank you very mush for sharing such valuable, clear and reliable info about LWF.
It's great for people like me working with CG but not coming from the big schools or studios.
At last I feel like this "debate" about LWF in 3ds + VRay is over now :)
Cheers
Thanks Olivie,
Any other topics got you confused? Ive been busy, but plan on writing on other topics soon.
Fred
it is over now! thank you soo much Sr.