

Spring Simulations with the Flex Modifier
Ever wish you could create a soft body simulation on your mesh to bounce it around? 3ds max has had this ability for many years now, but it's tricky to set up and not very obvious that it can be done at all. (This feature could use a re-vamp in an upcoming release.) I pull this trick out whenever I can, so I thought I'd go over it for all my readers. It's called the Flex modifier, and it can do more than you realize.
A Breif History of Flex
;) The flex modifier, originally debuted in 1999 within 3D Studio Max R3. I'm pretty sure Peter Watje based it on a tool within Softimage 3d called quick stretch. (The original Softimage, not XSI) The basic flex modifier is cool, but the results are less than realistic. In a later release, Peter added the ability for flex to use springs connected between each vertex. With enough springs in place, meshes will try and hold their shape and jiggle with motion applied to them.
The flex modifier, originally debuted in 1999 within 3D Studio Max R3. I'm pretty sure Peter Watje based it on a tool within Softimage 3d called quick stretch. (The original Softimage, not XSI) The basic flex modifier is cool, but the results are less than realistic. In a later release, Peter added the ability for flex to use springs connected between each vertex. With enough springs in place, meshes will try and hold their shape and jiggle with motion applied to them.
Making Flex into a Simulation Environment
So we're about to deal with a real-time spring system. Springs can do what we call "Explode". This means the math goes wrong and the vertices fly off into infinite space. Also, if you accidentally set up a couple thousand springs, your system will just come to a halt. So here are the setup rules to make a real time modifier more like a "system" for calculating the results...
- Save Often- Just save versions after each step you take.
- Use a Low Resolution Mesh- Work with springs on simple geometry, not your render mesh. Later, use the Skin Wrap modifier to have your render mesh follow the spring mesh.
- Cache your Springs- Use a cache modifier on top of the Flex modifier to make playback real-time. This is really helpful.
Setting Up the Spring Simulation
Ok, I did this the other day on a real project, but I can't show that right now so yes, I'm gonna do it on a teapot, don't gimme shit for it. I would do it on an elephants trunk or something like that... wait a sec, I will do it on an elephant trunk! (Mom always said, a real world example is better than a teapot example.)
;) OK, Lets start with this elephants head. (this elephant model is probably from 1999 too!) I'lll create a simple mesh model to represent the elephants trunk. The detail here is important. I start with a simple model, and if the simulation collapses or looks funky, I'll go all the way back to the beginning and add more mesh, and re make all my springs. (I did that at the end of this tutorial.) First, lets disable the old method of Flex by turning off Chase Springs and Use Weights. Next, let's choose a simulation method.
OK, Lets start with this elephants head. (this elephant model is probably from 1999 too!) I'lll create a simple mesh model to represent the elephants trunk. The detail here is important. I start with a simple model, and if the simulation collapses or looks funky, I'll go all the way back to the beginning and add more mesh, and re make all my springs. (I did that at the end of this tutorial.) First, lets disable the old method of Flex by turning off Chase Springs and Use Weights. Next, let's choose a simulation method.
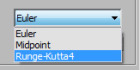 There are 3 different sim types. I couldn't tell you the difference. I do know that they get better and slower from top to bottom. With that said, set it to Runge-Kutta4 - the slowest and the most stable. (Slow is relative. in this example, it still gives me real time feedback.)
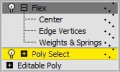 OK. Before we go making the springs, lets decide which vertices will be held in place and which will be free to be controlled by Flex. Go right below the Flex modifier and add a Poly Select modifier. Select the verts that you want to be free and leave the hold verts un-selected. By using the select modifier we can utilize the soft selection feature so that the effect has a nice falloff. Turn of soft selection and set your falloff.
About the Spring Types
;) Now that we know which verts will be free and which will be held, lets set up the springs. Go to Weights and Springs sub-object. Open advanced rollout and turn on Show Springs. Now, there are 2 types of springs. One holds the verts together by Edge Lengths. These keep the edge length correct over the life of the sim. The other holds verts together that are not connected by edges. These are called Hold Shape Springs. I try to set up only as many springs as I need for the effect to work.
Now that we know which verts will be free and which will be held, lets set up the springs. Go to Weights and Springs sub-object. Open advanced rollout and turn on Show Springs. Now, there are 2 types of springs. One holds the verts together by Edge Lengths. These keep the edge length correct over the life of the sim. The other holds verts together that are not connected by edges. These are called Hold Shape Springs. I try to set up only as many springs as I need for the effect to work.
Making the Springs
;) Bad SpringsTo make a spring, you have to select 2 or more vertices, decide which spring type you are adding in the options dialog, and press the Add Spring button. The options dialog has a radius "filter". By setting the radius, it will NOT make springs that are a certain distance from each other. This is useful when adding a lot of springs at once, but I try to be specific when adding springs. I first select ALL the vertices and set the dialog to Edge Length springs with a high radius. Then close the dialog and press Add Springs. This will make blue springs on top of all the polygons edges.
Bad SpringsTo make a spring, you have to select 2 or more vertices, decide which spring type you are adding in the options dialog, and press the Add Spring button. The options dialog has a radius "filter". By setting the radius, it will NOT make springs that are a certain distance from each other. This is useful when adding a lot of springs at once, but I try to be specific when adding springs. I first select ALL the vertices and set the dialog to Edge Length springs with a high radius. Then close the dialog and press Add Springs. This will make blue springs on top of all the polygons edges.;) Good Springs (In new releases, you cannot see these springs due to some weird bug.) After that, open the dialog again and choose shape springs to selected and then start adding shape springs. These are the more important springs anyway. You can select all your verts and try to use the radius to apply springs, but it might look something like the image to the left. If you select 2 "rings" of your mesh at a time and add springs carefully, it will look more like the one on the right. (NOTE: It's easy to over do the amount of springs. Deleting springs is hard to do since you have to select the 2 verts that represent the spring, don't be upset about it deleting all the springs and starting over.)
Good Springs (In new releases, you cannot see these springs due to some weird bug.) After that, open the dialog again and choose shape springs to selected and then start adding shape springs. These are the more important springs anyway. You can select all your verts and try to use the radius to apply springs, but it might look something like the image to the left. If you select 2 "rings" of your mesh at a time and add springs carefully, it will look more like the one on the right. (NOTE: It's easy to over do the amount of springs. Deleting springs is hard to do since you have to select the 2 verts that represent the spring, don't be upset about it deleting all the springs and starting over.)
When making your shape springs, you dont want to over do it. Too many springs can make it unstable. Also each spring sets up a constraint. Keep that in mind. If you do try to use the radius to filter the amount of springs, use the tape measure to measure the distance between the verts to know what you will get after adding springs.
Working with the Settings
In the rollout called "Simple Soft Bodies" there is 3 controls. A button that adds springs without controlling where, and a Stretch and Stiffness parameter. I don't recommend using the Create Simple Soft Body action. (Go ahead and try it to see what it does.) However, the other parameters still control the custom springs you make. Lets take a look at my first animation and see how we can make it better.
You know we can make it better? Take more than 20 seconds to animate that elephant head. What the hell Ruff? You can't even rig up a damn elephant head for this tutorial? Nope. 6 rotation keys is all you get. Anyway, the flex is a bit floaty huh? Looks more like liquid in outer space. We need the springs to be a lot stiffer. Turn the Stiffness parameter up to 10. Now let's take another look.
Better, but the top has too few springs to hold all this motion. It's twisting too much and doesn't look right.
;) Lets add some extra long springs to hold the upper part in place. To do this, instead of adding springs just between connected verts, we can select a larger span of verts and add a few more springs. This will result in a stiffer area at the top of the trunk. Now lets see the results of this. (NOTE: The image to the left has an overlay mode to show the extra springs added in light pink. See how they span more than one edge now.)
Lets add some extra long springs to hold the upper part in place. To do this, instead of adding springs just between connected verts, we can select a larger span of verts and add a few more springs. This will result in a stiffer area at the top of the trunk. Now lets see the results of this. (NOTE: The image to the left has an overlay mode to show the extra springs added in light pink. See how they span more than one edge now.)
;) Looking good. In my case here, I see the trunk folding in on itself. You can add springs to any set of vertices to hold things in place. The tip of the trunk flies around too much. I'lll create a couple new springs from the top all the way down to the tip. These springs will hold the overall shape in place without being too rigid.
Looking good. In my case here, I see the trunk folding in on itself. You can add springs to any set of vertices to hold things in place. The tip of the trunk flies around too much. I'lll create a couple new springs from the top all the way down to the tip. These springs will hold the overall shape in place without being too rigid.
Now lets see the result on the real mesh. Skin wrap the mesh with the spring mesh. I went back and added 2x more verts to the base spring mesh, then I redid the spring setup since the vertex count changed.
I then made the animation more sever, so I could show you adding a deflector to the springs. I used a scaled out sphere deflector to simulate collision with the right tusk. Now don't go trying to use the fucking UDeflector and picking all kinds of hi res meshes for it to collide with. That will lock up your machine for sure. Just because you can do something in 3dsmax, it doesn't mean you should do it.
So yeah, thats it. Now I'm not saying my elephant looks perfect, but you get the idea. Animate your point cache amount to even cross dissolve different simulations. Oh, and finally, stay away from the Enable Advanced Springs option. (If you want to see a vertex explosion, fiddle with those numbers a bunch.)
 Fred Ruff
Just talked to Peter Watje about flex. Thought I would share his knowledge.
"The biggest issue is when your sim goes nuts turn down the stiffness, turn up your simulation type, and turn up samples."
He also mentioned that you can try using flex with FFD cages... interesting idea...
Thanks Peter
